


Basic Rules for Battery Care & Maintenance
SAFETY PRECAUTIONS
 California Proposition 65 Warning: Batteries, battery posts, terminals and related accessories contain lead and lead compounds, and other chemicals known to the state of California to cause cancer, birth defects and reproductive harm. Wash hands after handling!
Warning: Follow all safety instructions when handling batteries! Always wear safety glasses and a face shield when working on or near batteries. All batteries generate explosive hydrogen gas. Keep sparks, flames and cigarettes away from batteries at all times. Do not connect or disconnect “live” circuits. To avoid creating sparks, always turn charging and testing equipment off before attaching or removing clamps.
ALWAYS DISCONNECT GROUNDED CABLE FIRST AND CONNECT IT LAST TO PREVENT DANGEROUS SPARKS.
Perform all work in a well ventilated area. Never lean directly over a battery while boosting, testing or charging it.
PROTECT YOUR EYES!
Batteries contain corrosive sulfuric acid that can destroy clothing and burn the skin. Neutralize acid spills with a paste made of baking soda and water or large quantities of water.
BE CAREFUL!
IN-VEHICLE SERVICE AND TESTING
Follow safety precautions:
WEAR PROPER EYE PROTECTION!
Prior to any testing, visually inspect the battery. Look for:
- Cracked or broken case or cover
- Loose cable connections
- Leaking case-to-cover seal
- Corrosion
- Damaged or leaking terminals
Neutralize any corrosion with a baking soda/water paste or battery cleaner spray. Scrape or brush off the residue and wash the area with clean water. Following your visual inspection, check the battery’s state of charge with a voltmeter.
You must boost charge a weak battery before load testing.
(See charging chart under “Charging Tips” section.) If fully charged, perform a load test. PROTECT YOUR EYES!
DRY CHARGE ACTIVATION
Important…WEAR PROPER EYE PROTECTION!
❶ Fill each cell to proper level with battery-grade sulfuric acid of 1.265 specific gravity. Battery and acid must be at a temperature of 60°F to 100°F (16°C to 38°C) at time of filling.
❷ Boost charge 12V batteries at 15 amps until specific gravity is 1.250 or higher and the electrolyte temperature is at least 60°F (15.5°C). BOTH CONDITIONS MUST BE MET. (Boost charge 6V and 12V heavy-duty batteries at 30 amps.)
If violent gassing or spewing occurs, reduce charge rate.
❸ After charging, check electrolyte levels. If required, add additional electrolyte to bring all levels to the bottom of the vent wells. DO NOT OVERFILL. If the battery requires top off while in service, add distilled water…
DO NOT ADD ACID.
SAFE INSTALLATION
Follow safety precautions:
WEAR PROPER EYE PROTECTION!
❶ Before removing old battery, mark the positive (+) and negative (–) cables for proper connection to the new battery.
❷ Always disconnect the ground cable first [usually negative (–)] to avoid any sparking around battery.
Then disconnect the positive (+) cable and carefully remove the old battery.
❸ Clean and inspect. If necessary, repaint or replace the tray, hold-down and/or battery cables. Cable ends must be clean and corrosion free. Cable must not be frayed or bare.
❹ Put corrosion protection washers on battery terminals. Install new battery in same position as old one and tighten hold-down. Be sure terminals will clear hood, fender, box lid, etc. to avoid vehicle damage and/or explosion.
❺ Connect positive (+) cable first. Connect ground cable last. If side terminal connection, use a special side terminal torque tool to tighten side terminal cables to avoid damage.
Never overtighten or hammer cables onto terminals.
❻ Coat terminals and cable connection with a corrosion protection spray.
CHECK THE CHARGING SYSTEM
The voltage regulator should be checked every 10,000 miles or every time you change oil. It should be checked immediately if the battery is hot to the touch, if electrolyte is bubbling or spewing from the vents, if your hydrometer reading is below 1.225 or above 1.300, or if the open circuit voltage is below 12.4 volts or above 12.9 volts. Overcharging is evident by excessive water consumption and/or spewing or bubbling of electrolyte out of the vents. Undercharging is evident by slow cranking or lights dimming at idle.
LOAD TESTING
Follow safety precautions:
WEAR PROPER EYE PROTECTION!
First perform an open circuit voltage test, then an adjustable load test. A load test is the best way to determine if the battery is delivering adequate electrical performance. Make sure your variable load tester is working properly.
❶ You can’t load test a discharged battery. If the voltage is below 12.4, be sure to completely charge it before continuing. Refer to the charging chart under “Charging Tips” section for important information.
❷ To avoid sparking and explosive gasses, be sure load tester is OFF and battery is disconnected before hook-up. Use computer memory saver to retain the vehicle’s electronic memory while the battery is disconnected.
❸ Connect the positive (+) tester clamp to the positive (+) battery terminal. Then connect the negative (–) tester clamp to the negative (–) battery terminal. Always protect your eyes.
❹ Set the tester for one-half the battery‘s 0°F cold crank rating and apply the load for 15 seconds. (If the CCA rating is unknown, use 1/2 of the minimum O.E. battery CCA requirement of the vehicle.)
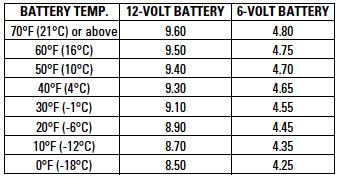
❺ Estimate the internal temperature of the battery to the nearest 10°F. Apply the load for 15 seconds. Note the voltage at 15 seconds with the load on and immediately shut the load off. A reading at least equal to the value from the chart below indicates a good battery.
❻ If the battery did not meet the required voltage and if it was not charged in Step 1, completely recharge the battery and repeat the test. If it still fails to meet requirements, replace the battery.
CONDUCTANCE TESTING
Follow safety precautions:
WEAR PROPER EYE PROTECTION!
Conductance uses the battery’s response to a very small signal in an attempt to predict the effects of a much larger current. Conductance testing is ineffective on a discharged battery. If the battery is known to be discharged or if the tester tells the operator to charge before testing again, the battery must be completely recharged.
❶ It may not be required to turn a conductance tester off or on. If off, you must turn on immediately when connected to a battery. Most will turn off automatically if ignored long enough. Some have no battery of their own and get all their power from the battery being tested.
❷ Connect the positive (+) tester clamp to the positive (+) battery terminal. Then connect the negative (–) tester clamp to the negative (–) battery terminal. If the battery has more than one pair of terminals (e.g. top posts and side terminals) always perform the testing on the terminals that are used in the vehicle. Use the proper charging adapters for stud or side terminal batteries. Never connect tester to a bolt or stud.
❸ Turn on if needed. Enter the requested information. Be sure to distinguish between a CCA rating and a CA or MCA rating. If no rating is available, use the minimum O.E. battery CCA requirement of the vehicle.
❹ If the tester says to replace a battery that was tested in the vehicle, repeat the testing after removing the cables and cleaning the posts.
CHECK THE STATE OF CHARGE
There are two styles of battery…non-accessible maintenance-free types and accessible maintainable types with removable vent caps.
Before adding water to a maintainable battery, take an open circuit voltage reading and/or hydrometer reading of one cell. Use a different cell each time. If the readings are below 75%, charge the battery. If the electrolyte level is too low to read
with a hydrometer, add water and take the hydrometer reading the following day, after the vehicle has been driven and the water has had an opportunity to mix. Check electrolyte levels in all cells. If necessary, add only clear, odorless drinking
water to bring the liquid level to the level indicator or to 1/2” (13mm) above the top of the separators. Distilled water is preferred, especially if the water in your area has high iron.
Do not overfill any cells. Excess electrolyte may be forced from an overfilled cell and cause corrosion on adjacent metal parts, reduce performance, and shorten life. In cold weather, do not fill cells with water and let stand without running engine or driving the vehicle long enough to allow water to mix with acid. Otherwise, freezing might occur and the battery may crack or explode.
Maintenance-free, non-accessible batteries are designed to eliminate the need to add water. Yet the volume of electrolyte above plates may eventually become depleted due to abnormal conditions such as high heat or improper regulator setting. Use a voltmeter to check the state of charge.
See chart under “CHARGING TIPS” to determine if charging is necessary.
DO NOT OPEN FLUSH COVER BATTERIES!
If opened, serious personal injury can result and warranty will be voided.
CHARGING TIPS
Follow safety precautions:
WEAR PROPER EYE PROTECTION!
✓ To avoid a battery explosion, never attempt to charge a frozen battery. Allow it to warm up to room temperature before placing on charge.
✓ Warning: Gel and AGM (Absorbed Glass Mat) batteries require a voltage-limited charger. Charging a Gel or AGM battery on a typical shop charger – even one time – may greatly shorten its life.
✓ Important: Never overcharge batteries. Excessive charging will shorten battery life.
✓ Prior to charging, read the manufacturer’s instructions for proper charger hook-up and use.
✓ Turn charger off prior to hook-up to avoid dangerous sparks. PROTECT YOUR EYES!
✓ Warning: If the electrolyte is accessible, verify that plates are covered before beginning to charge. At the end of charge, add distilled water as needed to bring levels to the proper height. If water is added, charge for an additional 30 minutes to mix. If electrolyte levels are low, but battery is not accessible, remove battery from service.
✓ The maximum charge rate in amperes should be no more than 1/3 of the battery’s reserve capacity minute rating. If the terminal voltage exceeds 16.0 volts while charging, reduce the charge rate.
✓ Continue charging and reduce the rate as needed until a two-hour period results in no increase in voltage or decrease in current.
✓ If violent gassing or spewing of electrolyte occurs, or the battery case feels hot to the touch, temporarily reduce or halt charging.
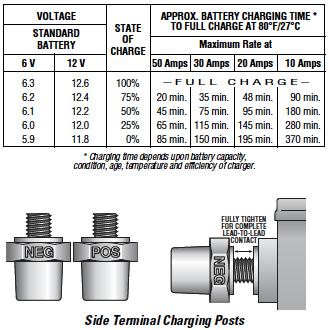
Side Terminal Charging Posts should be used to ensure the best testing and charging results for side terminal batteries. The charging posts will provide a flush lead-to-lead contact. Be sure to tighten the charging post until it is snug and secure. This will allow a strong current to pass from the charging post to the battery terminal.
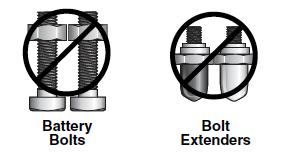
DO NOT USE Battery Bolt Extenders or Battery Bolts for testing or charging batteries. They do not provide the necessary lead-to-lead contact, and can reduce your cold cranking amperage (CCA) and state of charge readings.
Batteries should be boost charged if the open circuit voltage (voltmeter) reading is below 12.4 volts. See charging chart below.
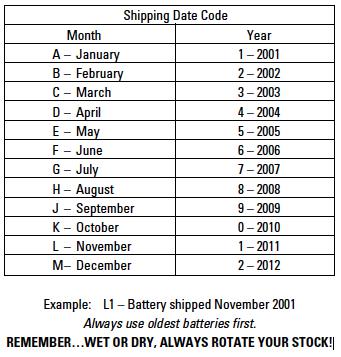
ROTATE BATTERY STOCK
Use oldest batteries first. Batteries require periodic stock rotation and routine charging. Always rotate stock using the FIFO (First In, First Out) method…NOT FISH (First In, Still Here).
BATTERY STORAGE TIPS
Batteries should be stored in a cool, dry area in an upright position. Never stack batteries directly on top of each other unless they’re in cartons. Do not stack more than 3 high (2 high if battery type is heavy commercial).
Test wet batteries every 4–6 months and recharge if necessary. Always test and charge if necessary before installation.